Dokumente in HireHop erstellen – Dokumente als PDF und drucken

Event Hire Software quote documentsHireHop verfügt über eine sehr leistungsstarke Dokumenten-Engine, mit der Sie professionelle und erstaunlich aussehende Dokumente erstellen können, und obwohl sie leistungsstark ist, ist sie sehr einfach zu bedienen.

Alle Dokumente sind Standard-HTML und unterstützen vollständig CSS und JavaScript, selbst wenn HireHop sie in ein PDF konvertiert.

Es stehen zahlreiche Standardvorlagen zur Verfügung, und jede Vorlage kann angepasst werden, wenn Sie ein zahlender HireHop-Abonnent sind.

Dokumenttypen

Ein Dokument ist nur an bestimmten geeigneten Stellen in der Software verfügbar, und unter bestimmten Umständen wird beispielsweise ein Stellenangebotsdokument nur angezeigt, wenn Sie sich in einem Auftrag befinden, und nicht, wenn Sie sich in der Lagerverwaltung oder einem Projekt befinden. Ein weiteres Beispiel ist, dass ein Auftragsrechnungsdokument nur angezeigt wird, wenn eine autorisierte Rechnung auf der Registerkarte „Abrechnung“ ausgewählt ist. Wenn die Rechnung also nicht autorisiert ist, wird das Rechnungsdokument nicht angezeigt.

Dokumentvorlagen

Unter Einstellungen->Dokumente können Sie ein neues Vorlagendokument hinzufügen oder vorhandene Dokumente bearbeiten. Alle Vorlagendokumente haben ein Vorhängeschloss-Symbol in der Rasterzeile, aber wenn Sie eines bearbeiten, wird eine Kopie als neues Dokument erstellt. Vorlagendokumente (die mit Vorhängeschloss-Symbolen) können problemlos gelöscht werden, da Sie sie jederzeit einfach wieder hinzufügen können. Dokumente ohne das Vorhängeschloss-Symbol sind benutzerdefinierte Dokumente und können nach dem Löschen nicht wiederhergestellt werden, daher wird empfohlen, Sicherungskopien aufzubewahren.

Bearbeiten eines Dokuments

HireHop hat zwar einen eingebauten HTML-Editor, dieser ist jedoch sehr einfach und es wird empfohlen, so oft wie möglich die „Quellen“-Ansicht zu verwenden.

HireHop-Dokumente verfügen über Briefvorlagenfelder, die von HireHop mit den entsprechenden Daten vorab ausgefüllt werden, wenn Sie ein Dokument drucken, herunterladen oder per E-Mail versenden. Die Liste der Felder und Erläuterungen zu ihrer Verwendung finden Sie unter https://myhirehop.com/modules/docmaker/fields.php.

Schnittstelle mit der API

Anstatt oder zusätzlich zur Verwendung von Briefvorlagenfeldern können Dokumente in HireHop auch mit der HireHop-API kommunizieren und Rohdaten direkt aus der Software abrufen. Bitte beachten Sie, dass dies aus Sicherheitsgründen nicht für freigegebene Linkdokumente funktioniert. HireHop-Dokumente können auch mit APIs von Drittanbietern kommunizieren und sogar JavaScript-Frameworks laden und verwenden.

Als Beispiel für ein Dokument, das seine Daten über die API erhält, kopieren Sie den Code aus dem Dokument unter https://myhirehop.com/docs/job_info.html und fügen Sie ihn in ein Jobdokument ein. Die Ausgabe ist nicht sehr interessant, es ist nur ein Dump von Daten, die vom Server über die API empfangen wurden.

Sie können auch Daten in einem Dokument buchen (versenden), was das Signaturanforderungsdokument tut. Ein weiteres Beispiel ist der folgende Code. Wenn Sie also ein Angebotsdokument drucken oder per E-Mail versenden, wird durch Hinzufügen des folgenden Codes zum Angebotsdokument jedes Mal automatisch ein Archiv erstellt, wenn das Dokument in einer neuen Registerkarte geöffnet, als PDF heruntergeladen oder per E-Mail gesendet wird als PDF.

<script>
	// Speichern Sie die Lieferliste als Angebot, nachdem das Dokument vollständig geladen wurde
	window.onload = function() {
		var http = new XMLHttpRequest(),
		    job_id = document.getElementById("number").textContent,
		    now_str = (new Date()).toLocaleDateString(),
		    params = "job=" + job_id + "&desc=" + encodeURIComponent("Angebot gesendet - " + now_str);
		http.open("POST", "/php_functions/archive_insert.php");
		http.setRequestHeader("Content-type", "application/x-www-form-urlencoded");
		http.send(params);
	}
</script>

Dokumente als PDF

HireHop verwendet zwei Engines, um Dokumente als PDFs zu rendern, nämlich Chromium, das von Google Chrome und Microsoft Edge verwendet wird, oder WebKit, das die Basis für den Apple Safari-Browser ist. WebKit ist viel älter und wird nicht mehr gewartet und unterstützt HTML5 nicht so gut wie Chromium, es ist jedoch aufgrund seiner Einfachheit viel schneller beim Erstellen von PDF-Dokumenten. Wenn es also mit Webkit gut aussieht, wird dazu geraten.

Dokument Briefpapier

Wenn Sie PDF-Dokumente mit HireHop drucken oder per E-Mail versenden, können Sie Briefpapier hinzufügen, auf das das Dokument gelegt wird. Briefpapier wird in der Depotverwaltung als PDF-Datei hochgeladen und ist daher für jedes Depot (auch virtuelle Depots) unterschiedlich.

Die Briefpapierseiten werden jeder zutreffenden Seite eines Dokuments hinzugefügt, und die letzte Briefpapierseite wird dann für alle verbleibenden Dokumentseiten wiederholt. Beispielsweise wird es bei einem einseitigen Briefpapierdokument hinter jeder Seite des Dokuments platziert. Wenn das Briefpapier ein zweiseitiges PDF ist, erscheint die erste Seite des Briefpapiers hinter Seite eins des Dokuments und die zweite Seite hinter Seite zwei und alle anderen nachfolgenden Dokumentseiten. Briefpapier kann so viele Seiten haben, wie Sie möchten.

Funktionsweise von Webhooks in HireHop

HireHop kann eine Nachricht mit Daten an andere Apps senden, wenn bestimmte Ereignisse innerhalb von HireHop ausgelöst werden. Diese Nachricht wird als Webhook bezeichnet, der die relevanten Daten automatisch an die gewünschte Stelle verschiebt.

WebhooksWas ist ein Webhook?

Ein Webhook sendet/pusht eine Nachricht mit an die Nachricht angehängten Daten, wenn bestimmte Dinge in HireHop passieren (ein Ereignis). Webhooks werden über HTTP gesendet (ruft eine Webadresse auf) und sind eine Möglichkeit, Daten in Echtzeit an andere Anwendungen zu senden. Webhooks liefern die relevanten Daten an bestimmte Anwendungen, während sie passieren, was bedeutet, dass die empfangende Anwendung Daten unmittelbar nach dem Ereignis erhält, was weitaus effizienter und schneller ist als das Abfragen von Datenänderungen.

HireHop-Webhooks können verwendet werden, um direkt mit anderen Apps zu kommunizieren oder an einen Konnektor wie Zapier gesendet werden, der die Daten formatieren und alle erforderlichen API-Rückrufe an HireHop oder an eine andere Anwendung durchführen kann.

Einrichten eines Webhooks

Gehen Sie in HireHop zu „Einstellungen“, klicken Sie dann auf die Registerkarte „Unternehmenseinstellungen“ und die Schaltfläche „Webhooks“ oben auf der Seite. Klicken Sie im Popup-Fenster auf die Schaltfläche „Neu“ und fügen Sie die URL hinzu, an die die Webhook-Nachricht gesendet werden soll, und wählen Sie jeden Webhook aus, auf den die URL antworten soll. Sie können beliebig viele Webhooks hinzufügen, sollten sie jedoch auf die notwendigen beschränken, auf die die jeweilige URL reagiert.

Ein HireHop-Webhook sendet Daten als JSON an Ihren URL-Endpunkt und enthält die folgenden oder ähnliche Daten.

{
    "time": "2022-03-29 07:50:42",
    "user_id": 1,
    "user_name": "John Smith",
    "user_email": "john@email.com",
    "company_id": 1,
    "export_key": "22u43mrjwe7u",
    "event": "invoice.status.updated",
    "data": { ... },
    "changes": {
        "FELDNAME": {
            "from": "alt",
            "to": "neu"
        }, ...
    }
}

Im obigen JSON-Beispiel sind die folgenden Felder:

  • time“ ist die UTC-Zeit und das Datum, an dem der Webhook gesendet wurde.
  • user_id“ ist die ID des Benutzers, der das Auslösen des Ereignisses verursacht hat.
  • user_name“ ist der Name ihres Benutzers.
  • company_id“ ist die eindeutige Nummernkennung des Unternehmens, für das der Benutzer arbeitet.
  • export_key“ ist der Wert des Exportschlüssels in den Unternehmenseinstellungen, der als Sicherheitsüberprüfung verwendet werden kann.
  • event“ ist der Name des ausgelösten Webhook-Ereignisses.
  • data“ sind die Daten, die sich auf das Webhook-Ereignis beziehen.
  • changes“ sind die Felder, die sich geändert haben, dh das, was sie waren, zu dem, wozu sie geändert wurden.

HireHop wartet nicht auf eine Antwort von der aufgerufenen URL oder meldet einen HTTP-Fehler beim Aufruf.

Beispiel-PHP-Code für einen URL-Endpunkt zum Erfassen der Webhook-Daten wäre:

<?php
	// Lesen Sie die JSON-Daten
	$postdata = file_get_contents('php://input');
	// Konvertieren Sie JSON-Daten in ein Objekt
	$data_str = json_decode($postdata);
?>


Posted in API

HireHop Rest API – Erste Schritte

HireHop baut auf einer API auf, was bedeutet, dass Sie alles, was Sie von HireHop sehen, auch mit der umfangreichen API erreichen können. Um auf die Rest-API zuzugreifen, benötigen Sie lediglich ein Benutzertoken, das als GET oder POST auf den entsprechenden URL-Endpunkt angewendet wird.

API-Token

Um ein API-Token zu generieren, gehen Sie zur Seite „Einstellungen“ und wählen Sie die Registerkarte „Benutzer“. Wählen oder erstellen Sie einen Benutzer, klicken Sie dann, während dieser bestimmte Benutzer ausgewählt ist, auf die Schaltfläche „Menü“ und dann auf die Option „API-Token“, um ein Token zu generieren. Der Token wird dann angezeigt und kann mit der Schaltfläche Kopieren in die Zwischenablage kopiert werden.

Das Token wird ungültig, wenn Sie die E-Mail-Adresse oder das Passwort des ausgewählten Benutzers ändern oder sich anschließend bei diesem Benutzer anmelden. Um dies zu verhindern, sollten Sie einen dedizierten API-Benutzer erstellen und ihm aus Sicherheitsgründen die entsprechenden Berechtigungen erteilen, um ihn auf alles einzuschränken, für das Sie die API nicht verwenden.

Aus Sicherheitsgründen sollten Sie das Token nicht im Frontend-JavaScript-Code verwenden, es sollte nur serverseitig verwendet werden. Wenn ein Hacker den Token erhält, kann er Ihre Daten auf HireHop ändern und darauf zugreifen, also halten Sie Ihren Token geheim. Wenn Ihr Token durchgesickert ist, ändern Sie einfach das Passwort des API-Benutzers und generieren Sie einen neuen Token.

Verwenden eines Tokens

Ein Token sollte als GET- oder POST-Parameter festgelegt werden, der als „Token“ bezeichnet wird. Um beispielsweise Jobdaten für Jobnummer 52 zu laden, ruft HireHop den API-Endpunkt auf:

https://myhirehop.com/php_functions/job_refresh.php?job=52

Wenn Sie denselben Endpunkt mit einem Token aufrufen möchten, lautet die URL:

https://myhirehop.com/php_functions/job_refresh.php?job=52&token=dqwejk5GVT65909bHHBN7922pq5hxjm%207hmn

Bitte denken Sie daran, dass Sie bei der Übergabe des Tokens über GET (ein URL-Parameter wie oben) den Token zuerst mit einem Tool wie https://meyerweb.com/eric/tools/dencoder codieren müssen.

Buchungsdaten

Um Daten in HireHop zu erstellen oder zu bearbeiten, müssen Sie einen POST verwenden. Beim Veröffentlichen von Daten sollten Sie nur die Felder setzen, die Sie ändern möchten, um beispielsweise einen Job über den Endpunkt https://myhirehop.com/php_functions/job_save.php zu erstellen oder zu bearbeiten, indem Sie den Parameter „job“ auf „0“ setzen “ oder weglassen wird ein neuer Job erstellt, alles andere ändert die entsprechende Jobnummer. Um den Firmennamen in der Stellennummer 52 zu bearbeiten, sollten die Stellendaten wie folgt lauten:

{
"job" : 52,
"name" : "New Name",
"token" : "dqwejk5GVT65909bHHBN7922pq5hxjm=-7hmn"
}

API-Endpunkte

Viele API-Endpunkte sind in der API-Dokumentation dokumentiert, viele weitere werden folgen.  Um den Endpunkt für eine Aufgabe einzurichten, verwenden Sie in der HireHop-Anwendung die Browserkonsole, um die Netzwerkaufrufe und die eingestellten Parameter zu überprüfen. Eine ausführliche Anleitung zu den URL-Endpunkten wird in Kürze veröffentlicht.

Ratenbegrenzungen

HireHop erlaubt jedem Benutzer 60 Verbindungsanfragen innerhalb von 1 Minute. Wenn mehr als 60 vorhanden sind, wird der Fehler „Sicherheitswarnung, zu viele Transaktionen“ (327) zurückgegeben.

Posted in API

Domänenübergreifende Schriftarten (Cross Domain Fonts) CORS – CSS font-face wird nicht geladen

Viele Benutzer haben einige erstaunliche Dokumente für die Verwendung in HireHop erstellt, die HTML5-, JavaScript- und CSS-Funktionen verwenden. Für diese Dokumente benötigen Benutzer manchmal eine spezielle Schriftart, die sie auf ihrem Server speichern. Manchmal scheint die Schriftart jedoch nicht im HireHop-Dokument zu funktionieren. Der Grund dafür liegt in den CORS-Einschränkungen (Cross-Origin Resource Sharing – CORS) in Browsern.

Nicht in Dokumente und Webseiten geladene Schriftarten

Die meisten Webbrowser erlauben keine domänenübergreifenden Anforderungen. Dies liegt an derselben Ursprungssicherheitsrichtlinie. Das Ergebnis ist, dass bei Verwendung von Web-Schriftarten aus einer anderen Domäne manchmal Fehler auftreten können und die Schrift nicht auf der Webseite (oder in HireHop-Dokumenten) geladen wird. Grundsätzlich werden aus Sicherheitsgründen einige Dateien als „nicht kennzeichnungspflichtig“ für verschiedene Domänen vom Server, auf dem sie gehostet werden, „markiert“, sodass der folgende typische Code möglicherweise nicht funktioniert:

<style type="text/css">
@font-face {
    font-family: "OpenSans";
    src: url("https://my_server.com/fonts/OpenSans.woff2") format("woff2");
}
html, body{
    font: normal 16px OpenSans, sans-serif;
}
</style>

Die Lösung

Um Ursprungsübergreifende Einschränkungen für Ihre Schriftarten festzulegen, muss die Antwort vom Remoteserver, auf dem die Schriftdateien gehostet werden, den Header Access-Control-Allow-Origin in der Schriftartdatei enthalten.

Wenn Sie Schriftarten wie Typekit oder Google Fonts oder Content-Delivery-Netzwerke wie BootstrapCDN, CdnJS oder JsDelivr verwenden, um Ihre bevorzugten Schriftarten zu laden, müssen Sie nichts tun, da der Header Access-Control-Allow-Origin lautet bereits in ihrem Antwortheader gesendet.

Apache

Fügen Sie zum Konfigurieren eines Apache-Webservers den folgenden Code in die Datei httpd.conf oder .htaccess ein.

  1. Fügen Sie die MIME-Header in Apache hinzu:
    AddType application/vnd.ms-fontobject    .eot
    AddType application/x-font-opentype      .otf
    AddType image/svg+xml                    .svg
    AddType application/x-font-ttf           .ttf
    AddType application/font-woff            .woff
    AddType application/font-woff2           .woff2
    
  2. Aktivieren Sie CORS (Cross-Origin Resource Sharing) in Apache für die MIME-Typen:
    <IfModule mod_headers.c>
      <FilesMatch ".(eot|otf|svg|ttf|woff|woff2?)$">
        Header set Access-Control-Allow-Origin "*"
      </FilesMatch>
    </IfModule>
    

NGINX

Fügen Sie zum Konfigurieren eines NGINX-Webservers den folgenden Code in die Datei /etc/nginx/nginx.conf oder in Ihre benutzerdefinierte Datei /etc/nginx/conf.d/custom.conf ein.

  1. Fügen Sie die MIME-Header unter NGINX hinzu:
    application/vnd.ms-fontobject    eot;
    application/x-font-opentype      otf;
    image/svg+xml                    svg;
    application/x-font-ttf           ttf;
    application/font-woff            woff;
    application/font-woff2           woff2;
    
  2. Aktivieren Sie CORS (Cross-Origin Resource Sharing) unter NGINX für die MIME-Typen:
    location ~* .(eot|otf|svg|ttf|woff|woff2)$ {
        add_header Access-Control-Allow-Origin *;
    }
    

IIS

Fügen Sie zum Konfigurieren von Microsoft IIS den folgenden Code zum Block web.config system.webServer hinzu.

  • Aktivieren Sie CORS (Cross-Origin Resource Sharing) in IIS
    <system.webServer>
      <httpProtocol>
        <customHeaders>
          <add name="access-control-allow-origin" value="*" />
          <add name="access-control-allow-headers" value="content-type" />
        </customHeaders>
      </httpProtocol>
    </system.webServer>
    

PHP

Wenn Sie die Servereinstellungen nicht ändern können, können Sie jederzeit PHP verwenden, um die Schriftartdatei bereitzustellen.

  • Verwenden Sie eine Server-Skriptdatei anstelle einer physischen Schriftartdatei
    <style type="text/css">
    @font-face {
        font-family: 'OpenSans';
        src: url('https://my_server.com/fonts/OpenSans.php') format('woff2');
    }
    html, body{
        font: normal 16px OpenSans, sans-serif;
    }
    </style>
    
  • So beheben Sie domänenübergreifende @ font-face-Probleme mit PHP beim Erstellen der folgenden Datei und nennen sie „OpenSans.php“.
    <?php
    // fonts.php
    header('Access-Control-Allow-Origin: *');
    header('Content-Type: application/font-woff2');
    echo @file_get_contents('/fonts/OpenSans.woff2');
    ?>
    
Posted in API

How To Setup HireHop With QuickBooks – HireHop Equipment Rental Software + QuickBooks

QuickBooks Equipment Rental SoftwareHow Do HireHop and QuickBooks Integrate?

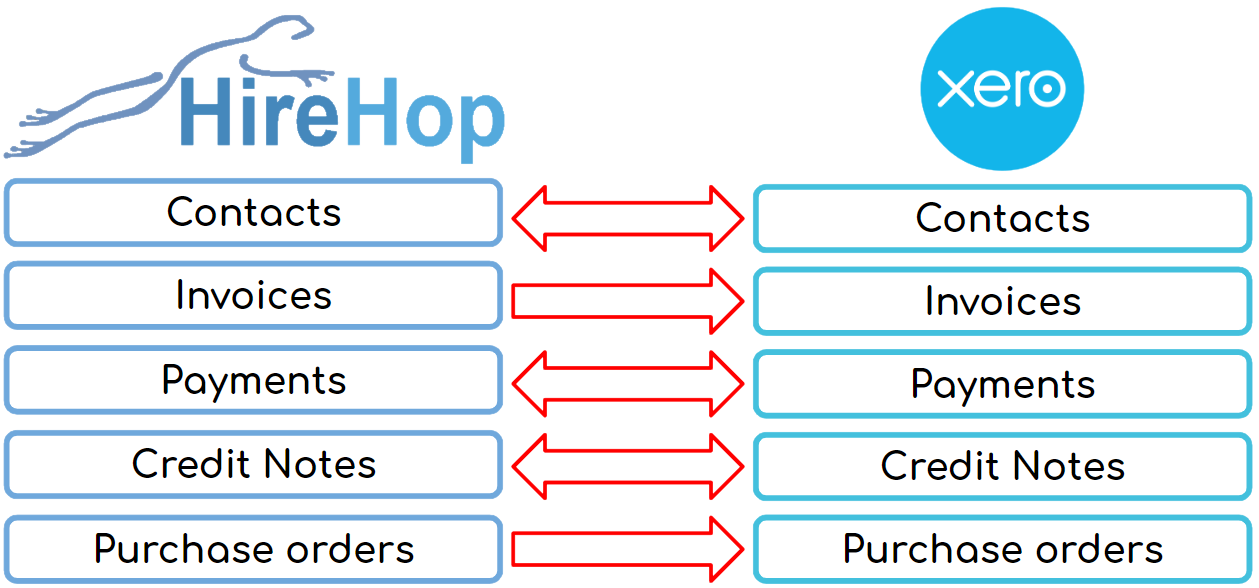
HireHop can produce your invoices, credit notes, payments and purchase orders.  HireHop also has an address book that contains customers and suppliers, as well as jobs where the customer is unique and not in the address book.  HireHop also keeps track of what has been paid and credited against invoices, as well as the balance of a customer’s account.

QuickBooks needs these invoices, credit notes, payments, purchases orders and contacts created in HireHop for bookkeeping purposes. With our integration working seamlessly behind the scenes, HireHop tells QuickBooks when they are created or updated so you don’t have to. In turn, HireHop needs to know what payments or credits have been applied in QuickBooks so that it can register invoices as being paid or not.

What Data Does HireHop Send To QuickBooks?

There are two modes to synchronize data between HireHop and QuickBooks – being live or buffered:

  • In live mode, as soon as you create or edit an invoice, credit note, payment, or purchase order, it is immediately sent to QuickBooks.
  • In buffered mode they are all kept in a buffer until such time you which to synchronize data between HireHop and QuickBooks.  Any invoice, credit note, purchase order or payment that fails to sync with QuickBooks in Live Mode will automatically be put into the buffer for a manual sync.  All buffered invoices and credits can be viewed in the Invoices to be Exported report.

HireHop invoices are sent to QuickBooks once the status has been changed to Approved or above.  If an Approved invoice is edited, it is re-sent to be updated in QuickBooks.  The same goes for Purchase Orders, Credit Notes and Payments.

All new contacts used in invoices and purchase orders are automatically sent to QuickBooks from HireHop.

In QuickBooks, an entry in the address book can’t be both a customer and supplier, therefore, as this feature is available in HireHop, when this happens, HireHop will create two entries in the QuickBooks address book, one for the customers address book, and one for the supplier address book.

Once you have synchronized or connected HireHop to QuickBooks, QuickBooks will authorise this connection for 3 months, after which time HireHop will prompt you to reconnect the next time a connection is needed.

What Data Does QuickBooks Send To HireHop?

Contacts are imported from QuickBooks into HireHop in Settings, enabling you to import only the contacts that you need so that your address book doesn’t become cluttered.

When a payment or credit note is applied to an invoice within QuickBooks, they are sent over to HireHop and registered to the corresponding invoice. The invoice status is then automatically marked as having been paid or not.


How To Setup QuickBooks With HireHop

Setup HireHop with QuickBooks

  • In HireHop Settings click the Accounts tab.
  • In the Accounts click the New button on the right of the Accounting Packages table at the bottom of the screen, and a new accounts package window will open.
  • Click the first option that is titled „Integrate with„, and select „QuickBooks„. You can then set prefixes and start numbers for invoices, credit notes and purchase orders. You can also choose to buffer transactions and sync them when you decide, instead of having live and automated updates. Click the Next button to move on.
  • The „Accounts“ page enables you to enter nominal codes and banks accounts.  Click the Synchronize button and HireHop will import all bank accounts and nominal codes from your QuickBooks account.  You should delete all the ones you won’t use in HireHop (you can add them back later). There will be one bank account and two nominal codes in bold, these are your defaults that can be changed.  The defaults are the ones selected when you don’t assign a nominal to an item. Once finished, click Next.
  • The next page is your „Tax codes“, again click the Synchronize button and HireHop will import them from QuickBooks.  Again you can edit and change the defaults from the automatically set ones. Once finished, click Next.
  • Lastly is the „Contacts“ page. You don’t have to import these, but if you do, you can match ones that are already in HireHop,  import others and delete the ones you won’t use.  Once finished click the Save button.

You will now see QuickBooks in the Accounting Packages table and some red flashing „Assign“ buttons.  As HireHop can support multiple accounting packages in the same installation, different ones for individual depots or groups of depots, you have to set which depots use this version of QuickBooks.  Also HireHop has tax and nominal groups, again, these need to be assigned to QuickBooks ones.

  • Click the Assign button next to the „Accounting packages“ table, click on the depot and select „QuickBooks“ and then click the Save button.  If a depot is not set, it will use the default accounting package, if a virtual depot is not set, it will use the parent depot’s accounting package.
  • Click the Assign button next to the „Nominal groups“ table, click on the QuickBooks row and each column to assign a nominal code to a nominal group. Once finished, click the Save button.  Any nominal group not set will resort to the default revenue or expense nominal code.
  • Lastly, click the Assign button next to the „Tax groups“ table, click on the depot rows assigned to QuickBooks and click in each column to assign the appropriate Tax codes to the depot, and then click the Save button.

You have now setup QuickBooks and we are ready to go.


Find out more and try QuickBooks Accounting Software for free.

How To Setup HireHop With Xero – HireHop Equipment Rental Software + Xero Accounting

Xero Equipment Rental SoftwareHow Do HireHop and Xero Integrate?

HireHop can produce your invoices, credit notes, payments and purchase orders.  HireHop also has an address book that contains customers and suppliers, as well as jobs where the customer is unique and not in the address book.  HireHop also keeps track of what has been paid and credited against invoices, as well as the balance of a customer’s account.

Xero accounting software needs these invoices, credit notes, payments, purchases orders and contacts created in HireHop for bookkeeping purposes. With our integration working seamlessly behind the scenes, HireHop tells Xero when they are created or updated so you don’t have to. In turn, HireHop needs to know what payments or credits have been applied in Xero so that it can register invoices as being paid or not.

What Data Does HireHop Send To Xero?

There are two modes to synchronise data between HireHop and Xero – being live or buffered:

  • In live mode, as soon as you create or edit an invoice, credit note, payment, or purchase order, it is immediately sent to Xero.
  • In buffered mode they are all kept in a buffer until such time you which to synchronise data between HireHop and Xero.  Any invoice, credit note, purchase order or payment that fails to sync with Xero in Live Mode will automatically be put into the buffer for a manual sync.

HireHop invoices are sent to Xero once the status has been changed to Approved or above.  If an Approved invoice is edited, it is re-sent to be updated in Xero.  The same goes for Purchase Orders, Credit Notes and Payments.

All new contacts used in invoices and purchase orders are automatically sent to Xero from HireHop.

What Data Does Xero Send To HireHop?

Contacts are imported from Xero into HireHop in Settings, enabling you to import only the contacts that you need so that your address book doesn’t become cluttered.

When a payment or credit note is applied to an invoice within Xero, they are sent over to HireHop and registered to the corresponding invoice. The invoice status is then automatically marked as having been paid or not.


How To Setup Xero With HireHop

Setup HireHop with Xero

  • In HireHop Settings click the Accounts tab.
  • In the Accounts click the New button on the right of the Accounting Packages table at the bottom of the screen, and a new accounts package window will open.
  • Click the first option that is titled „Integrate with„, and select „Xero„. You can then set prefixes and start numbers for invoices, credit notes and purchase orders. You can also choose to buffer transactions and sync them when you decide, instead of having live and automated updates. Click the Next button to move on.
  • The „Accounts“ page enables you to enter nominal codes and banks accounts.  Click the Synchronise button and HireHop will import all bank accounts and nominal codes from your Xero account.  You should delete all the ones you won’t use in HireHop (you can add them back later). There will be one bank account and two nominal codes in bold, these are your defaults that can be changed.  The defaults are the ones selected when you don’t assign a nominal to an item. Once finished, click Next.
  • The next page is your „Tax codes“, again click the Synchronise button and HireHop will import them from Xero.  Again you can edit and change the defaults from the automatically set ones. Once finished, click Next.
  • Lastly is the „Contacts“ page. You don’t have to import these, but if you do, you can match ones that are already in HireHop,  import others and delete the ones you won’t use.  Once finished click the Save button.

You will now see Xero in the Accounting Packages table and some red flashing „Assign“ buttons.  As HireHop can support multiple accounting packages in the same installation, different ones for individual depots or groups of depots, you have to set which depots use this version of Xero.  Also HireHop has tax and nominal groups, again, these need to be assigned to Xero ones.

  • Click the Assign button next to the „Accounting packages“ table, click on the depot and select „Xero“ and then click the Save button.  If a depot is not set, it will use the default accounting package, if a virtual depot is not set, it will use the parent depot’s accounting package.
  • Click the Assign button next to the „Nominal groups“ table, click on the Xero row and each column to assign a nominal code to a nominal group. Once finished, click the Save button.  Any nominal group not set will resort to the default revenue or expense nominal code.
  • Lastly, click the Assign button next to the „Tax groups“ table, click on the depot rows assigned to Xero and click in each column to assign the appropriate Tax codes to the depot, and then click the Save button.

You have now setup Xero and we are ready to go.


Find out more and try Xero Accounting Software for free.

Anpassung und Anpassung von Widgets – HireHop API NoHTML Framework

HireHop ist vollständig anpassbar, Sie können sogar benutzerdefinierte Felder hinzufügen, alles mithilfe der HireHop-JavaScript-Injektionsmethode, bei der von Ihnen geschriebene JavaScript-Dateien in HireHop-Seiten eingefügt werden. Wenn Sie sich die Seitenquelle einer HireHop -Seite ansehen, sehen Sie <!– PLUGINS –>, hier wird das JavaScript für Ihre Plugins eingefügt.

HireHop wurde von Grund auf aufgebaut und hat unser eigenes Framework entwickelt, das wir NoHTML nennen. Dabei wurden vorhandene Technologien und Methoden zusammengeführt, um ein Framework zu erstellen, das einfach zu verwenden und erweiterbar ist und ein schnelles Laden von Seiten auch bei langsamen Internetverbindungen ermöglicht.

Abgesehen vom Hauptteil der Seite werden die Hauptteile von HireHop dynamisch auf dem Client-Rechner mit JavaScript und jQuery-Widgets erstellt, ähnlich wie REACT und JSX, aber einfacher und natürlich mit dem bekannten jQuery-Framework. Wenn Sie beispielsweise eine Jobseite laden und die Seite überprüfen (drücken Sie F12 für den Objektinspektor des Browsers), sehen Sie unten auf der Seite ein <div>-Element, das wie folgt strukturiert ist:

<div id=“notes_tab„></div>

Wie Sie sehen können, ist <div> nur ein leeres div-Element. Wenn Sie auf die Registerkarte „Notizen“ klicken, wird das obige Element plötzlich mit Elementen gefüllt. Wenn Sie sich den Inspektor Ihres Browsers ansehen, werden Sie auch feststellen, dass die einzigen Daten, die vom Server geladen wurden, JSON waren und nicht der Code im Notizen-Tab. Der Notizen-Tab wurde dynamisch auf dem Client-Rechner mit einem benutzerdefinierten jQuery UI Widget namens $.notes() (intern $.custom.notes genannt) erstellt, das in der Datei /js/notes.js definiert ist, und dieses Widget verwendet ein Ajax Aufruf an den Server, um die Daten zum Auffüllen abzurufen.

Alle Widget-Dateien auf HireHop sind aus Geschwindigkeitsgründen komprimiert. Um jedoch die erweiterte Quelle anzuzeigen, fügen Sie einfach eine .MAX am Ende des Dateinamens hinzu, z. B. /js/notes.MAX.js.

Um JavaScript in Ihre Webseiten einzufügen, gehen Sie zu Einstellungen->Unternehmenseinstellungen und fügen Sie in Plugins die URL Ihrer JavaScript-Datei hinzu, die sich auf einem https-Server befinden sollte. Sie können mehrere URLs hinzufügen, die Sie mit einem „;“ trennen können. (Semikolon). Alle URLs müssen zu einer sicheren https-Domain führen.

Erweitern eines Widgets

Da es sich um jQuery-UI-Widgets handelt, können Sie eine Art objektorientierte Programmiertechnik verwenden, um Teile der HireHop-Widgets zu überschreiben. Zum Beispiel werden wir ein kleines Plugin erstellen, das ein Span-Element mit dem Wort Hello nach der Schaltfläche Aktualisieren im Notizen-Widget hinzufügt.

Erstellen Sie zunächst eine JavaScript-Datei auf Ihrem Webserver und fügen Sie den folgenden Code hinzu:

$(document).ready(function(){
// Überprüfen Sie, ob das Notizen-Widget vorhanden ist
if(typeof($.custom.notes)!=“undefined“ && hh_api_version<=1) {
// Notizen-Widget neu definieren
$.widget(„custom.notes“, $.custom.notes, {
_init_main: function() {
// Rufen Sie das alte _init_main . auf
this._super(arguments);
// Fügen Sie nach dem Aktualisieren-Button ein Hallo hinzu
$(„<span>„,{ html:“Hallo“ }).insertAfter(this.btnRefresh);
},
// Fügen Sie dem Widget sogar Ihre eigenen neuen Funktionen hinzu, wenn Sie möchten

new_function_name: function() { }
});
}
});

Der obige Code ist in einer Datei unter https://s.myhirehop.com/plugins/demo.js.

Den obigen Code Zeile für Zeile erklären:

$(document).ready(function(){
Zuerst warten wir, bis das Dokument fertig ist und alle Seitenelemente und JavaScript-Dateien geladen sind. In diesem Fall ist dies nicht erforderlich, da die Datei /js/notes.js vor dem Plugin-Skript geladen wird. Für dieses Beispiel haben wir sie jedoch als Referenz belassen.

if(typeof($.custom.notes)!=“undefined“ && hh_api_version<=1) {
Als nächstes testen wir, ob das Notizen-Widget definiert wurde, wenn ja, werden wir einen Teil davon überschreiben. Hier testen wir auch die HireHop-API-Version, die der Benutzer verwendet. Wenn neue Versionen von HireHop veröffentlicht werden, hat der Benutzer die Möglichkeit, sie zu verwenden, und dies stellt sicher, dass Ihr Plugin mit dieser Version kompatibel ist.

$.widget(„custom.notes“, $.custom.notes, {
Hier initiieren wir das Zusammenführen eines neuen JavaScript-Objekts, das Funktionen enthält, in das Notizen-Widget.

_init_main: function() {
Wird eine Funktion gleich wie eine vorhandene benannt, wird diese überschrieben.

this._super(arguments);
Dies ruft die geerbte Funktion auf, die die Funktion ist, die wir überschreiben.

$(„<span>“,{ html:“ Hello“ }).insertAfter(this.btnRefresh);
Anschließend fügen wir ein einfaches Span-Element hinzu, das das Wort „Hallo“ hinter der Schaltfläche „Aktualisieren“ enthält. Sie können auch  $(„<span> Hello</span>“).insertAfter(this.btnRefresh); verwenden. Um Elemente zu adressieren, sollten Sie immer die den Elementen zugewiesenen Variablen verwenden und niemals die Element-IDs, da die meisten IDs auf HireHop dynamisch erstellt werden und bei jeder Instanz unterschiedlich sind. Wenn die Element-ID Zahlen enthält oder nicht gut benannt ist, verwenden Sie sie auf keinen Fall.

new_function_name: function() { }
Schließlich macht dies nichts und ist für das, was wir tun müssen, nicht erforderlich, es zeigt nur, dass Sie sogar Ihre eigenen Funktionen in das Widget einfügen können.

Wenn Sie die HireHop-Seite neu laden, sehen Sie nach der Schaltfläche „Aktualisieren“ das Wort „Hallo“, wenn Sie alles richtig gemacht haben.

Versionierung

Ein großer Vorteil der Verwendung des HireHopNoHTML-Frameworks besteht darin, dass das gesamte JavaScript zwischengespeichert wird, was zu einem schnellen Laden der Seite führt, da der Browser die JavaScript-Dateien in seinem Cache verwendet. Dies kann problematisch sein, wenn Sie Ihr Plugin aktualisieren, da alle Benutzer, die es verwenden, ihre Browser nicht die aktualisierte Version herunterladen, sondern stattdessen ihre zwischengespeicherte Version verwenden, es sei denn, sie löschen ihren Browser-Cache.

Um dies zu umgehen, können Sie beim Hinzufügen Ihrer JavaScript-URLs zu den Plug-in-Optionen einen Versionierungsparameter verwenden, z. B. für https://www.mywebsite.com/plugin.js geben Sie ihn als https://www.mywebsite.com/plugin.js?v=1. Nach einem Update können Sie es in https://www.mywebsite.com/plugin.js?v=2 ändern, wodurch alle Browser gezwungen werden, die JavaScript-Datei von Ihrem Server neu zu laden. Wenn Sie keinen Server zum Speichern des Codes haben, können Sie jederzeit GIST oder Google Open Source verwenden.

Arbeitsdemo

Wenn Sie in Ihren Plugins unter „Einstellungen->Unternehmenseinstellungen“ den Pfad „https://myhirehop.com/plugins/navigation_menu.js“ hinzufügen, sehen Sie oben rechts auf Ihrem Bildschirm ein Navigations-Kontextmenü. Wenn Sie sich den Quellcode ansehen, können Sie sehen, wie dieses grundlegende Plugin funktioniert.

Bitte beachte, dass Plugins aus Sicherheitsgründen nicht auf der Einstellungsseite geladen werden und nur geladen werden, wenn du ein kostenpflichtiges Abonnement hast.

Posted in API

Custom Fields – HireHop API

You can have an unlimited number of custom fields in HireHop specific to each record, a record being a job, project, test/service, asset, etc.  All custom fields can be used in documents, as long as they exist, otherwise they will just be blank.

Currently custom fields are only fully supported in Jobs and Projects. Custom fields can only be used using plugins.

Custom Fields Structure

When fetching a custom field for the currently edited record, there is a function called _get_custom_field_value(field) which will return NULL if the field is not set, a string, or a JavaScript object, depending on how you saved it.

You probably should save custom fields as a JavaScript object (like JSON) in the following format for more printing control, as if it is just a string, HireHop will treat it as a string:

"field_name" :
{
"value"  : "The value of the field",
"type"   : "The field type, default is text, it can also be number, currency, text, date, html and array"
"format" : "For date type only, eg "ddd, dddddd tt" // = "Mon, January 1 2017 12:00"
}

  • value is the value of the field in any format.
  • type tells HireHop how the field should be treated when merging it into a document. An array field will be displayed as JSON.
  • format tells HireHop how to format the field in the document, currently only available dates and is dependent on the users settings and how their date and time formats are set:
    • dddddd for a long date (like January 1 2018)
    • ddddd for a short date (like 01/01/2018)
    • dddd for the day of the week (like Monday)
    • ddd for the short day of the week (like Mon)
    • tt for the time (like 12:36 am).

The format part is only needed for dates and if it is not set, nothing will show.  You can merge formats together and add separators, for instance you can use dddd, dddddd tt which will give „Monday, January 1 2018 12:00“ if the user has set a date order as day month year. The value for a date type must be stored in the yyyy-mm-dd hh:mm format.

If you just save the field as a string and not a JavaScript object, that’s fine, HireHop will just treat it as a string.  Saving your custom fields as a JavaScript object will give you greater control, especially when HireHop prints them in a document.

Saving The Custom Fields

On all edit forms that support custom fields, there is a function called _save_custom_field_value(field, value).  This stores your fields to be saved later.  If you can’t find the function, please contact us.

Please note, that all changes must be written prior to saving.

When the custom fields are saved, they are merged with the existing fields, and any new fields passed with the same name as any existing ones, the new values will be set.

When saving the custom fields, for example using /php_functions.job_save.php directly as an API call, only parameters set will be updated, so if you only set the custom_fields post parameter, only the custom fields will change, all the other fields will stay as is.

Printing Custom Fields

All custom fields can be incorporated into documents just like normal fields and are prefixed with a single „_“ (underscore) character.  For example, for a custom field in a job called „field_name“, you would load it by using the merge field „job:_field_name„.

Naming Custom Fields

Some custom fields in documents merge fields together, for example tests merge with an asset in some document fields, so be careful not to use the same field name in an asset and a test.  Also, other plugins maybe added in the future written by yourself or from another source, so add a prefix that denominates you, for example plugins written HireHop by use the „hh_“ prefix, so a field written in a plugin by us might be called „hh_NewName“.  Field names in document merges are not case sensitive, but they obviously are in JavaScript.

Searchable Custom Field

There is an additional field called CUSTOM_INDEX, that can be used for searching, filtering and listed in search results.  The field is a 45 character string value that can be set to NULL. To enable the field to be shown in the search results on the home page, change the allSearchCols global JavaScript variable by adding CUSTOM_INDEX to it:

if(allSearchCols.constructor===Array && doc_type==0 ) {
allSearchCols.push("CUSTOM_INDEX");
}

There is also a language setting for the custom field displayed name:

if(typeof(lang["customIndexTxt"])=="undefined" || lang["customIndexTxt"]=="") {
lang["customIndexTxt"] = "Custom field name";
}

The reason for the testing for undefined or blank above is just in case the user has set it in the language.

You can use the custom searchable field in the page by adding a lookup in the page or the editor.  On jobs there is a hidden tile that displays the  CUSTOM_INDEX field and can be shown and utilised like so in a plugin:

$("#job_tile_custom_index")
.show()
.click(function() {
window.open("https://www.my_external_app.com?id="+job_data["CUSTOM_INDEX"],"newwindow");
});

To save the CUSTOM_INDEX field in the relevant edit widget, using a custom plugin you can add a form element into the edit widget, for example like so:

// This adds the CUSTOM_INDEX field into the job edit widget
if(typeof($.custom.job_edit)!="undefined") {
// Redefine job_edit, move name to after telephone
$.widget("custom.job_edit", $.custom.job_edit, {
_init_main: function() {
// Call the old _init_main
this._super(arguments);
// Add an extra edit in the job edit
var table = this.default_disc.closest("table");
var tr = $("<tr>").appendTo( table);
$("<td>", { html: lang.customIndexTxt+ " :" }).appendTo(tr);
$("<input>", {
"name" : "custom_index", // Parameter to pass when saving
"class" : "data_cell",   // Setting class to data_cell tells HireHop it is a standard data field
"data-field" : "CUSTOM_INDEX", // Name of the field
"maxlength" : 45         // The CUSTOM_INDEX has a maximum length of 45 characters
})
.appendTo( $("<td>").appendTo(tr) );
// Change the memo height to compensate
this.job_edit_memo.height(110);
}
});
}

The CUSTOM_INDEX field is called xxx:custom_index in the document and is passed as a string into the document.

Global Custom Fields

Occasionally you might want to store a global counter, etc. for the whole company.  To read and store global custom fields use /php_functions/custom_fields_global_load.php and /php_functions/custom_fields_global_save.php.  Saving the data, you need to pass either a json string or json array:

$("#saving_dialog").dialog("open");
// This adds the CUSTOM_INDEX field into the job edit widget
$.ajax({
url: "/php_functions/custom_fields_global_save.php",
type: "post",
dataType: "json",
data: {
"fields":{"my_field":"any type of value"}
// or a json string
// "field":'{"my_field":"any type of value"}'
},
success: function(data)
{
$("#saving_dialog").dialog("close");
// HireHop reported an error
if(typeof(data.error) !== "undefined")
error_message(isNaN(parseInt(data.error)) ? data.error : lang.error[data.error]);
else
{
// All good, "data" is a javascript object (JSON) of all global custom fields
}
},
// Handle an http error
error: function(jqXHR, textStatus, errorThrown)
{
$("#saving_dialog").dialog("close");
error_message(lang.error[1]+" ("+errorThrown+").");
}
});

Posted in API

Feed Stock Data to Your Website

Synchronise with the cloud

HireHop allows you to seamlessly feed stock data to your website; enabling you to list hire and rental stock on your website, with images and other data, that is synchronized with the HireHop equipment rental software’s database.

You can filter the lists (or not) by category or name, as well as sort them by name, price, weight or stock quantity held. You can also choose what format you want the export in, albeit JSON, CSV or XML

This feature can also be used to export your hire stock data easily, enabling you to export filtered parts of your data or all of it at once, the choice is yours.

How to Get a List

Before you export a list, you must first create an export key. This key is like a password that must be passed to get the list.  If you change the export key, any requests made not using the new export key, will be denied.

To get the export, you need a link, this you can get from the Hire Stock Management page.  By clicking on Menu and then Get data link, a box will appear with a link to get a list for the current filtered view.  To get the export link, you must be authorised to get it in the user permissions.

If you apply any filtering in the Hire Stock Management page, this filter will be the data the generated link will produce.  So for example, if you select a category and then get a data link, the data produced by the link will be all the stock in that category, just as it is listed on the page.

The data returned by HireHop includes the name, an image link, quantity, category, weight, dimensions, prices, part number, etc.

Technical

https://s.myhirehop.com/modules/stock/stock_export.php?id=10&key=abc1234def&depot=1&cat=0&sidx=TITLE&sord=asc&format=xml

The generated link will look something like above, and as you can see, it has various parameters that are explained below:

Parameter Meaning
id This is a unique ID for your company.
key The generated export key.
depot  An identifier for a depot (zero means all depots), to get the quantity.
cat The identifier for a category
cat_name The name of a category
name The name search
del If set to one, deleted items will be listed
unq A unique ID of an item. If set, only one item will be returned.
sidx The column to sort by
sord The sort order; asc = ascending & desc = descending
format The format the data will be returned in, being XML, CSV or JSON (default)

To load the data into your web page, you can Ajax it using JSONP, for example, with JQuery:

$.ajax({
    url: "https://s.myhirehop.com/modules/stock/stock_export.php?id=10&key=abc1234def",
    dataType: "jsonp",
    success: function( data ) {
        console.log( data );
    }
});

Please note, the service, pat test and test intervals are in ISO 8601 period formats and all dimensions and weights are metric.

Convert Seaward PAT Test Data To CSV – Seaward PAT Test Data To Excel Spreadsheet Online Tool

Many users of HireHop Rental Business and Asset Management Software have asked us how they can import their PAT test data from their Seaward PAT testers.  This can be done using the Seaward PAT Guard 3 software, however to save our users from having to pay for this software, we have added a small tool below where you can upload the ASCII text output file from your Seaward tester, and we will return the data in a CSV format that you can use to import into HireHop.

This format works with testers such as the Apollo, PrimeTest and SuperNova PAT testers, including the Apollo 600, Apollo 500, Apollo 400, Supernova Elite, PrimeTest 250+ range of testers.


Choose a file to convert by clicking the „Choose File“ button.